Are you wondering how to longarm quilt swirls!? Swirls are a popular and versatile quilting motif that can add depth, texture, and movement to your quilt designs. Whether you're a beginner or an experienced quilter, mastering swirl quilting can take your quilting projects to the next level.
To get started with longarm quilting swirls, you need to choose appropriate fabrics and batting, prepare your quilt top, back, and batting for quilting, and choose the right thread and needles. Once you've prepared your materials, you can draw the swirls on your quilt top using a water-soluble marker or chalk, or by using a pre-printed quilting pattern. Then, you can begin quilting your swirls by using a longarm quilting machine.
In this article, I will take you through the step-by-step process of longarm quilting swirls, from preparing your fabrics and choosing the right thread to draw and quilting your swirl designs. I will also cover some frequently asked questions and tips to help you overcome any challenges you may encounter along the way. So without further ado, let’s get started.
How do longarm quilt swirls?
Preparing for Swirl Quilting
Before you begin swirl quilting, it's important to prepare your materials and equipment to ensure that your quilt turns out well. This section covers the key steps in preparing for swirl quilting.
Choosing Appropriate Fabrics and Batting
When selecting fabrics for your quilt, it's important to choose high-quality, 100% cotton fabrics that will hold up well during the quilting process. Avoid using synthetic fabrics or blends, as they can be more difficult to quilt and may not hold up as well over time.
Similarly, it's important to choose the right batting for your quilt. Batting comes in different thicknesses and materials, so choose one that is appropriate for the weight and intended use of your quilt.
Preparing the Quilt Top, Back, and Batting for Quilting
Before you start quilting, you'll need to prepare the quilt top, back, and batting. This may involve pressing the fabric to remove any wrinkles, trimming the edges of the quilt top and backing to ensure they are straight, and basting the layers together.
Choosing the Right Thread and Needles
Choosing the right thread and needles is critical for successful swirl quilting. Select a high-quality thread that matches the color of your fabric and is appropriate for the weight of your quilt. Use a quilting needle that is designed for use with a longarm quilting machine, and make sure to change it frequently to ensure that your stitches are consistent and even.
Creating Swirls
Once you've prepared your materials and equipment, you can begin creating swirls on your quilt. This section covers the key steps in creating swirls.
Before you start quilting, it can be helpful to draw the swirls onto the quilt top using a fabric marker or chalk. This will help guide your stitching and ensure that your swirls are consistent in size and shape.
Beginning to Quilt the Swirls
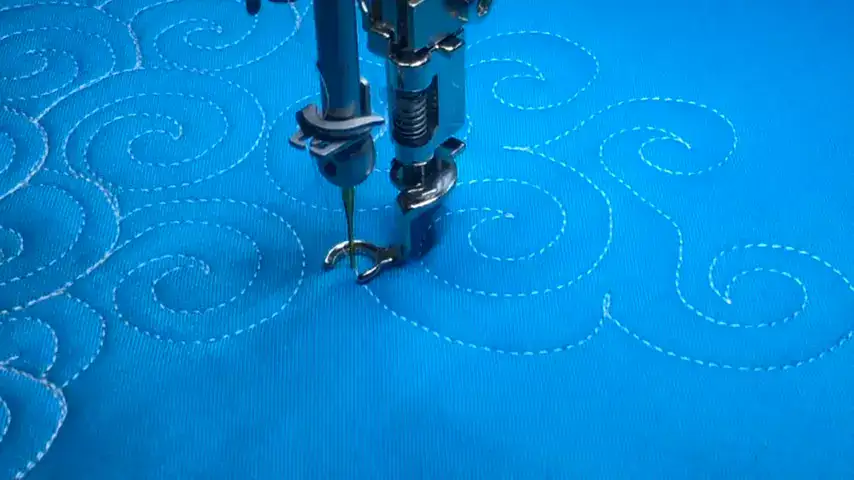
To begin quilting swirls, start in the center of the area you want to quilt and work your way outwards. Move the quilting machine in a circular motion to create the swirls. It can be helpful to practice on a scrap piece of fabric before you start quilting on your actual quilt.
To make smooth and consistent swirls, it's important to move the quilting machine at a consistent speed and keep the machine moving in a circular motion. It can be helpful to practice creating swirls of different sizes and densities to get a feel for how the machine moves.
To adjust the size and density of the swirls, you can vary the speed of the quilting machine and the spacing of the swirls. Experiment with different settings until you achieve the desired look.
Swirl Variations
Swirls can be varied in many ways to create different looks and textures on your quilt. This section covers some of the ways you can vary swirls.
There are many different types of swirls you can create, including large and flowing swirls, tight and dense swirls, and swirls of different shapes and sizes.
To create variations in swirl designs, try varying the size, spacing, and shape of the swirls. You can also experiment with different thread colors and textures to create different effects.
Swirls can be combined with other quilting motifs to create more complex designs. For example, you can combine swirls with straight lines, feathers, or meandering stitches to create a more textured look.
Troubleshooting Swirl Quilting
Even with careful preparation, it's possible to encounter issues when swirl quilting. This section covers some common issues and how to address them.
Common mistakes in swirl quilting include:
- Uneven Stitches
- Inconsistent Swirls
- Tangled Thread
To avoid these issues, make sure to practice on scrap fabric before quilting on your actual quilt, and make sure to keep the quilting machine moving at a consistent speed.
If you make a mistake in swirl quilting, don't panic! You can usually fix the issue by carefully unpicking the stitches and starting over. If the mistake is small, you may be able to fix it by adding additional stitches to the area.
Finishing the Quilt
Once you've finished quilting the swirls, you'll need to finish the quilt by trimming the edges and adding the binding. This section covers some tips for finishing the quilt.
Tips for Improving the Overall Appearance of Swirls
To improve the overall appearance of swirls, make sure to use high-quality thread and needles, and take breaks as needed to avoid fatigue. It can also be helpful to practice regularly to build your skills and confidence. Here are some tips:
- Practice: The more you practice quilting swirls, the more confident and comfortable you will become with the motif.
- Relax: It's important to relax your hands and shoulders while quilting to avoid tension and fatigue. Take frequent breaks to stretch and rest your hands.
- Consistency: Try to maintain a consistent swirl size and spacing throughout your quilt. This will help create a cohesive and polished look.
- Density: Vary the density of your swirls to add interest and texture to your quilt. You can quilt dense swirls in some areas and more open swirls in others.
- Quality of Thread: Experiment with different thread colors and textures to enhance the dimensionality of your swirls.
- Marking: Use a water-soluble marker or chalk to draw your swirls onto your quilt top before quilting to ensure consistency and accuracy.
- Planning: Plan your swirl design ahead of time, considering the overall layout and balance of your quilt.
- Stitches: Make sure your stitches are consistent in length and tension to avoid any puckering or distortion of the quilt top.
Frequently Asked Questions (FAQs)
Do I need a special tool to create swirls using a longarm quilting machine?
No, you don't necessarily need any special equipment beyond a longarm quilting machine and appropriate thread and needles. However, it's important to have a good understanding of how to use your longarm quilting machine to achieve the desired swirls.
Can I create swirls using a regular sewing machine?
Yes, it is possible to create swirls using a regular sewing machine, but it can be more challenging due to the size and weight of a quilt. Longarm quilting machines offer greater ease and flexibility when working with large quilts.
How do I choose the right thread and needles for swirl quilting?
You'll want to choose a thread that complements the colors and fabrics of your quilt top, and also one that is strong enough to handle the tension of longarm quilting. Needles should also be selected based on the thickness and composition of your quilt and batting.
Are there any tips for drawing swirls on my quilt top?
Yes, it can be helpful to use a fabric marker or chalk to draw the swirls lightly onto your fabric. You can also use templates or stencils to create consistent swirl shapes.
How do I avoid puckering or wrinkles when quilting swirls?
Ensuring that your quilt top, backing, and batting are all taut and secured properly is key to preventing puckering or wrinkles. Take your time and work slowly when quilting to ensure everything stays in place.
Can I create swirls in any direction or should they all be consistent?
Swirls can be created in any direction you choose, depending on the look you want to achieve. Some quilters prefer consistent swirls throughout the quilt, while others may vary the direction and shape of the swirls for a more organic or random look.
Do I need to be experienced in longarm quilting to create swirls?
While some experience with longarm quilting can be helpful, it's not necessarily required to create swirls. With practice and patience, even beginners can achieve beautiful swirls in their quilts.
What are some common mistakes to avoid when quilting swirls?
Some common mistakes to avoid include working too quickly or forcing the machine, which can cause puckering or uneven stitching. It's also important to keep an eye on tension, thread breakage and skipped stitches, and adjust your machine as needed.
How can I add variation or interest to my swirl quilting?
You can add variation or interest to your swirl quilting by incorporating different shapes, sizes, or densities of swirls throughout the quilt. You can also experiment with using different colors or textures of thread to create contrast and visual interest.
How do I finish off my quilt once the swirls are complete?
Once your swirl quilting is complete, you'll need to trim any excess batting or backing fabric and bind the edges of the quilt. There are many tutorials and resources available online to help you complete these final steps.
What if I make a mistake while quilting swirls?
Well, mistakes happen, even to the most experienced quilters. If you make a mistake while quilting swirls, try to undo or correct the mistake as soon as possible. You may be able to rip out the stitches and start over, or you may be able to work around the mistake and incorporate it into the overall design.
How can I ensure my swirls are evenly spaced and consistent?
One way to ensure your swirls are evenly spaced and consistent is to use a quilt stencil or marking tool to trace the swirls onto the quilt top before quilting. This can help you keep your spacing and design consistent throughout the quilt. Another technique is to use a ruler or straight edge to guide your swirls and keep them evenly spaced.
Can I use different thread weights or colors for my swirl quilting?
Yes! Using different thread weights or colors can add visual interest and texture to your swirl quilting. Experiment with different thread types and colors to see what works best for your project.
Can I mix swirls with other quilting motifs in my quilt?
Absolutely! Mixing swirls with other quilting motifs can create a unique and interesting design. Some popular combinations include swirls with feathers, stippling, or straight line quilting.
Wrap Up
To wrap it up, if you are an experienced quilter you can create direct swirls on the quilt. However, if you are a beginner then it is crucial that you draw the swirls on the quilt top first. So, I hope this blog post has given you the knowledge and confidence you need to create stunning swirl designs on your quilts.
Remember, practice makes perfect, so don't be afraid to experiment with different thread colors and quilting motifs until you find the perfect combination for your project.
If you ever find yourself struggling or feeling stuck, take a break, step back, and look at the big picture. Quilting should be a fun and enjoyable experience, so don't get too bogged down in the details.
And don't forget to share your beautiful quilting creations with your fellow quilters – there's nothing quite as satisfying as showing off a finished quilt! 😀